Avaliable Products

Monday, April 30, 2012

Filling a (large) hole...

Between machining T5 adapter plates on the mill, I was able to make some headway on the '40's gas tank.


I started by first forming a lip around the cut out section of the tank.  This will help in making a leak tight seam when I go to weld the patch in.


 Next I cut a piece of 18ga roughly the shape of the opening, a couple of inches bigger.  It needed to be stretched in order for it lay down in the opening.  My large plastic mallet and shot bag did the trick.

 The dents were smoothed on the english wheel.  It's starting to take shape but didn't fit quite right.

 It needed a bit more stretching.

It took three more times of fitting, stretching and wheeling before it fit close enough.


 After a bit of a trim, it's ready to weld.


The Wilmington mile....

My hats off to the ECTA.  What a great event!  The weather played havoc on Saturday but there still was plenty of racing.  I definetly will be returning...


By the way, the ranchero went 143mph with a 2.3 4 banger...pretty cool

Friday, April 27, 2012

Off to Wilmington....

...for some good land speed fun.  http://www.wilmingtonmile.com/


Tuesday, April 24, 2012

Shocking...

Front shocks never really seemed to top the list of things that needed done on the '40.  That held true until recently I noticed the front tire bouncing like a basketball in the reflection of a car I was passing.  There had always been a slight vibration felt though the steering wheel, but I just assumed that the tires were simple out of balance.  I would have never guess that the front axle would have been excited quite like that.

I used a set of F1 shock mounts from a '48-'52 ford truck.  They really made things easy.  I've should have done this a long time ago...

The shocks in the above picture are simply for setup.  I used an old Napa Sensatrac catalog to find the correct length replacements.  I have to say that it's quite handy to have reference material like this. The catalog breaks down each shock by length, configuration and application.  So, I have a question for you, what does the following list have in common?

'57-'57 Divco
'48-52' Ford ruck
Every International Pickup
1978 Honda Civic
and a '77 Dodge Colt

They all used the same shock...apparently the exact one I need too.  Interesting...


More and more projects....

Once again, things have picked up in the machine shop and I haven't had much time to work on any automotive related projects.  I've been running a bit ragged lately as I have a propensity to take on way too many projects all at the same time.  No matter how hard I try, it seems I spread myself way too thin.  Oh well, at least I am starting to catch back up...just in time to tackle more projects.

Anyway, I've been doing some work for he University of Akron's Formula SAE Electric race team.  Here is the event's website: www.formula-hybrid.org   The program is in it's infancy, but there is quite a bit of potential so I've been trying to help as I can.  Here are the front spindles I machined last evening.


Monday, April 16, 2012

Progress on the '40...

Well, since a 9" rear end housing is so much larger than what was previously in the '40, the gas tank required some minor relieving.  Anytime that cutting or welding is required on a gas tank, I am a bit apprehensive.  In reality, there probably wouldn't be an issue with cutting on the tank if there were no vapors left in it.  However, I wasn't going to take any chances.  After giving it a thorough washing, I completely filled the tank with water before I did any cutting.  This made a mess when I started to cut though and by the end, I was completely soaked.

Another way that is as effective is to purge the tank with argon.  The argon will displace all of the oxygen and since argon is inert, gas vapors will not react when exposed to a flame.  This requires an additional full bottle of argon, which I didn't have.


So now, I just ave to patch the hole....no big deal.

Busy...

Making some chips over the weekend...

Friday, April 13, 2012

New parts...

As I was putting together all of the new parts, it occurred to me that the design of the Bendix style bakes are quite remarkable.  With relatively few parts, none of which are that tightly machined (with the exception of the wheel cylinder), they perform flawlessly for years.  That Vincent Bendix...what a smart guy.  Read about him here....Bendix History

I am excited to give these brakes a try.  The front still needs to be address, but still, this has to be much safer than the old '46-'48 Ford brakes that were on here before.


Oh Snap....

Ironically, someone sent me this Youtube video right before I went to go install my 9"axles in the '40.


It would be hard press to say that the '40 is going to launch that hard...but still, I checked and rechecked to make sure everything thing was tight.


Monday, April 9, 2012

The new rear....some progress....

I never liked the u-bolt plates for the old rear end.  It's time I made some new ones.

Louver #2...

I've been working on the louver dies again.  This time, a flat 4" wide louver.


I can not begin to tell you how much I like the Surface Parallel Toolpath feature in my CAM software....

Road Kill...

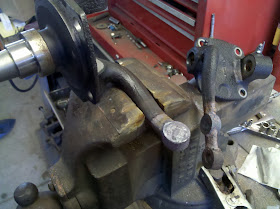
A poor little groundhog met his demise when the drag link on Lil' Pepe caught him while out for a drive.  Unfortunately, the groundhog wasn't that little and bent it.


The axle uses early ford spindles and with them, the drag link installs from the bottom.  Normally, the original Ford axle has a bit of a drop to it and there is no issue. However, with a true straight axle, the drag link is the lowest part of the car.  So, time to make it install from the top.


The original holes were welded up so that they can be re-drilled a reamed with the taper on the correct side.


Hopefully, we should be able to get everything reinstalled tonight.

Wednesday, April 4, 2012

Dashing....

This has been an idea that I have wanted to attempt for quite sometime. I don't know why, seeing how I do not even own a vehicle that I could put it in. 

The first step in any casting project is a mold.  I designed this one in CAD first to make sure that all of the gauges would fit.


 Then onto the mill...


 With some sanding and a couple coats of clear lacquer,  I think we are ready for an attempt.

A new rear...

Well, it's time to take the old banjo out and replace it with a 9".  I hate to do it, but sometimes you just have to.

What started this project was that the rear tires were rubbing on the inside when I aggressively go around a corner. Sure, I could have used a 1/2" wheel spacers and that would have solved my problem.  However, I would still have a 70 year old rear end.  Every time that I bang second, in the back of my mind I always wonder if this is the time that it finally lets go.  Not anymore...


 The springs are 1 3/4" wide and I have no idea what they came out of...they were laying in the original parts '40 ford parts car.  The spring pads that Summit stocks are for 2 1/2" wide springs.  To get everything to work, I milled 3/4" out of the center of the pads and then welded them back together.  I still have to make the u-bolt plate and drill the center hole in the spring pads.  Hopefully I can get that done tonight and get the truck back on the ground to set the pinion angle.