Thursday, February 24, 2011

File, Print, Done...

Maybe I am just a geek a heart, but it seems that I am continuously amazed by technology.  Burt21 over on the H.A.M.B. contacted me to draw a CAD model of a fuel block that he wanted to eventually cast in aluminum.  We talked about possibly machining a female mold that his foundry man could use to make a male form from.  I suggested that we try this place: 


File, Print, Done...


The surface finish didn't turn out too bad.  There will be some hand finishing required, but should turn out really well.  Apparently, the process prints every 0.010" so you will not be able to get a perfect part, but still, I am impressed. 

Tuesday, February 22, 2011

Rust Repair Continued...

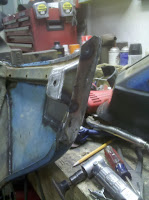
Rebuilding the structure of the fender proved to be more difficult than the fender itself.  I started by cutting away all of the rust, then rebuilt it all as close as I could to the original.


Spots welds always finish things off...


Now, on to the driver's side.

Rust repair....

A good friend of mine dropped off a plethora of front fenders for his '65 Chevy truck.  Of course, each one had either some rust or some dents.  I started on the passenger side first.  The fender on the left was by far the most solid of the bunch, so that is the one I fixed.  It was pretty well mangled near the bottom of the door so I took a large section of the blue fender to graph into it.  I specifically cut it in a region that I could get in behind it after it was all welded up.  Doing this way also allowed me to fix the rust spot while the "patch" was off of the underlying structure. 

 The pic on the left is of the  repaired rust spot on the "patch" panel.  With no fender structure underneath, the back side was accessible the finish the repair with a the hammer and dolly.  On the right is were I started to finish the weld of the "patch" to the original fender.  I do most of the initial grinding with a die grinder and them follow up with the 2" right angle grinder. 


The outside skin is done, now I have to rebuild the inner structure...

Tuesday, February 8, 2011

Louver lover...

I've always like louvers....although they can be over done sometimes.  Actually, come to think of it, they are overdone quite a bit.  Regardless, I have been thinking about building a louver press for sometime.  If I am to go to the effort of welding a frame and machining all of the components, I want the machine to be more than just for louvers.  My idea is to build somewhat of a universal frame that can accept different attachments such as, obviously, a louver die but also possibly a bead roller attachment or a shrinker/stretcher attachment.  Just think, the possibilities are endless!

As my buddy Tom says
One thing at a time...
So, for now, I will first focus on the louver press.  Most of the louver dies currently commercially available are either crap or look way to industrial.  They all have flat profiles and no style.  I figured I could do better.

These are Rev A of the louver die collection.  I wanted a 2 1/2" wide louver with a crown to it.

They were made out of  O1 tool steel then heat treated after the machining was complete.  By they way, O1 doesn't cut too terrible with the correct tooling.  This was actually one of the first projects on #406


With the dies made, I have begun designing the frame.  I had several lengths of 4"x4"x1/4" tubing that with serve for the basis of the frame and I plan on covering the sides with 1/4" plate.  I want to run some analysis to make sure that I limit the deflection to an acceptable amount.  I still have quite a few details to work out, but here is somewhat I am thinking,