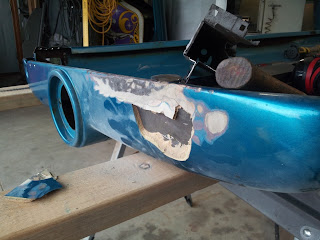
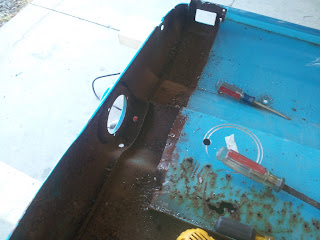
Made a little progress over the weekend. These beds are really quite interesting how they are assembled.
Monday, July 29, 2013
Friday, July 26, 2013
Fleetside repair...
Over the week, I had a '58 Chevy fleetside bed dropped off for some rust repair. The outside of he bed is spotless. I am surprised how well of shape it is in. The inside, however is a different story....especially all of the sub-structure. The more I poked and prodded, the more rust I found.
After getting the bed unbolted, I chose the worst side and began dis-assembly. The main rear upright was completely gone on the inside. The only way of getting to it is by drilling the spot welds and removing the entire structure.
Not much left...but we'll fix that....
The Hudson is done....
I worked over last weekend to try and finish the long list of little items that need to be completed so that we could get it out the door.
The T5 was considerably larger that the original transmission. That meant a little extra clearance was needed. The floor pan was initially cut so that there was enough clearance all the way around. I fashioned a small hump using the Pullmax and english wheel. It didn't have to be that deep of a shape so it wasn't too difficult. I planned on taking pictures as it progressed but my camera wasn't charged and before I knew it, I was done anyways...I take better pics on the next one....I promise.
The customer also wanted a short exhaust extension coming off of the dual manifold so that the exhaust shop had something to hook to. A couple of left over header tubing pieces did the trick...
Over all, I am fairly satisfied with how everything turned out. Hudsons are definitely an unique car but they also have an unique personality.
Wednesday, July 17, 2013
Radiator redo....
One of the request from the customer on the Hudson project was to repair the original radiator. At first glace, it looked usable with a few areas of concern, but nothing major. Once we pressure tested it however, it was a different story. There were leaks everywhere ad it needed re-cored. So, it was decided to just go ahead and make/modify an aluminum one.
I usually start with the Summit Racing brand universal application radiators. They are actually Northern Radiators that are re-boxed in a Summit box. There a very cost effective and come in a variety of sizes. They are designed for cross flow application, so the filler neck has to be relocated. Also, in most cases, the top tank has to be modified. So, before I can get it out of the box, the top tank is usually laying on the floor...
The tank is fab'd up out of 0.05" thick aluminum and then welded on. In the past, I use to submerge the radiator in a barrel of water up to where I had to weld to keep everything cool while welding. However, with the brazing that is used to the hold the core in, this really isn't necessary. I simply weld where I need to and move on.
The original radiator mounted on the frame with 2 carriage bolts. We made a couple of these pieces to fully encapsulate the head and welded them on the bottom in the proper location and angle...
After making some grill shell mounts, we have a new radiator that will outperform the orignal...
Tuesday, July 9, 2013
Industrial grade...
My daughter is almost 6 months old now and I figure that she is going to need a playground soon. Sure, my wife and I could have gone to one of the big box stores and bought one of those mainstream, run-of-the-mill wooded sets that every house seems to have in the back yard that is in some form of disrepair. But, that just simply would not do...I want something better, something bigger, something industrial strength and maybe... something with a little bit of history.
I have been looking for a while, actually even before she was born, for a vintage playground set from either a school or park. I had two requirements...it had to be old and it had to be big. I finally found it over the weekend at a local auction and ended up getting it all. A couple of pieces I was able to buy outright, but the remainder I had to get off of a scrap dealer.
My father and his co-worker, Skip where there just to look good for the camera...
Talking with the bother-in-law of the original owner, all of this equipment came from the old Montrose Drive-in Threater that closed in 1985. The only information I was able to find was here and here. I really would like to find some old pictures of the drive in and maybe of the equipment.
The '40 is gone...
After much consideration, I finally decided to let the '40 go to a new owner. Even though I built the truck originally with the intention to sell, it sort of grew on me. I actually hated to see it go, but in the end it never seemed that I could find the time or ambition to finish it like it should have been.
So, onto new projects...
So, onto new projects...
Monday, July 1, 2013
Hudson engine mounts...
The Hudson is progressing along nicely. We were able to get the engine mounts made Saturday morning and the engine was bolted in for the final time. There had to be a relieve made on the passenger side for the extraneously large fuel pump on the 262.
The shifter, clutch linkage and drive shaft look like they are all going to work out really well. This should be a pretty neat piece when it's done.
The shifter, clutch linkage and drive shaft look like they are all going to work out really well. This should be a pretty neat piece when it's done.
Subscribe to:
Comments (Atom)


