Had the spend the last week in North Ireland. It was a great experience but I do have to say that I am glad to be back in the shop.
Please be patient, I have several updates in the works...

Tuesday, June 21, 2016
Sunday, June 12, 2016
Out of the shop for a bit...
Over the next week, I will be out of the shop. Feel free to email with any questions.


Tuesday, May 31, 2016
Dodge 218 Truck to T5 conversion...
So , the Dodge 218/230 truck T5 conversions are actually relatively simple to do. I normally do not make these parts but I might start if there is enough of an interest.
The truck bellhousings actually have enough material where they can be redrilled for the T5 bolt pattern. What's nice is that because of their overall length, there isn't a need for any adapter or special made clutch disc. However, there still are several issues that need to be addressed.
The register hole on the bellhousing is 4-3/4" diameter where as the register diameter on the T5 is 4-11/16". A simple ring is needed that presses onto the register of the T5 to make if 4-3/4" diameter.


You can see that on the one side, there is a slight lip. This lip fits into the chamfer on the bellhousing hole and prevents the ring from coming off.
The next issue is the pilot bearing. To provide adequate support to the T5's input shaft, the pilot bearing has to stick out from the back of the crank a bit.

Another issue is that on some of the bolt patterns drilled into the stock truck bellhousing, the upper driver's side hole interferes withe the T5's hole. So, the easiest way to address this is to take a bolt and thread it in until is tightens up. Then, cut it off, grind flush and stake it so that it can not back out. Very carefully, drill and tap the new hole.

The last issue to address is to machine a collar to press into the original release bearing. This reduces the ID so that the release bearing will properly ride on the T5's bearing retainer.

Dodge 218 supercharger mounting...
As I try to finish up some of the long term projects I have going on, I was able to devote sometime the the belt tensioner on the Graham Super Charger mounts.
The only belt I had was a little long so don't mind the zip tie...


The only belt I had was a little long so don't mind the zip tie...


Let there be lights....
Over the Holiday weekend, I was able to finish up at least the front half of the Ohio State truck...
It's always a good feeling when the lights work again....
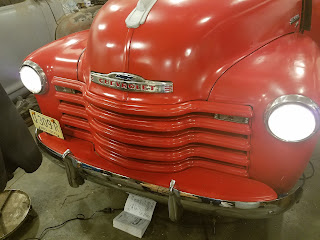

It's always a good feeling when the lights work again....


Tuesday, May 24, 2016
Tidying up...
As I was finishing the connections up the hood, the fuel and vacuum lines kept catching my eye. I just couldn't leave them alone...so....I ended up redoing them.
Before:

After:

I also had to address the temp and oil lines as well as the choke cable. I don't quite know what to do with the speedo cable yet though...


Before:

After:

I also had to address the temp and oil lines as well as the choke cable. I don't quite know what to do with the speedo cable yet though...


Thursday, May 19, 2016
Wiring progress...
As I began making the connections under the hood, I needed to do something with the wires exiting the firewall. In the past, I've seen on early Fords a dished out metal cover that hides the hole in the firewall and acts somewhat like a clamp for the wires. I always thought that was an elegant idea so, I wanted to use it on this project.
Here is the finished cover, installed:

I should have taken more pictures of the the start of forming, but I pretty much just started hitting a scrap piece of 20ga. between the open jaws of the vise with a ball peen hammer...not to exciting really. To form the exit of the wireway, I used a piece of round bar stock as a form and again, hit it with a hammer while I had the piece positioned between the open jaws of the vice. The vice jaws acted like the female dies of a mold and gave me that "crisp" edge.


So yeah, it looks pretty ugly at this point...

...but you just have to keep at it and work the imperfections out. The first step is to get the shape followed by making it smooth.

The vise handle makes a perfect dolly to work against.

You eventually get to a point that there is so much extra material that you can't proceed without cutting the excess away.

Once it's to the basic shape, keep working it against the the "dolly" and what ever else might be lying around. I used the chunk of steel that it's resting on the help define the edge.

Hit it with the right angle grinder to sand the last imperfections out and install. It took about 45 minutes from start to finish.

Here is the finished cover, installed:

I should have taken more pictures of the the start of forming, but I pretty much just started hitting a scrap piece of 20ga. between the open jaws of the vise with a ball peen hammer...not to exciting really. To form the exit of the wireway, I used a piece of round bar stock as a form and again, hit it with a hammer while I had the piece positioned between the open jaws of the vice. The vice jaws acted like the female dies of a mold and gave me that "crisp" edge.


So yeah, it looks pretty ugly at this point...

...but you just have to keep at it and work the imperfections out. The first step is to get the shape followed by making it smooth.

The vise handle makes a perfect dolly to work against.

You eventually get to a point that there is so much extra material that you can't proceed without cutting the excess away.

Once it's to the basic shape, keep working it against the the "dolly" and what ever else might be lying around. I used the chunk of steel that it's resting on the help define the edge.

Hit it with the right angle grinder to sand the last imperfections out and install. It took about 45 minutes from start to finish.

Subscribe to:
Posts (Atom)